Google Shopping Ads are the best ad format for eCommerce sites. With Google Shopping Ads, you can put images of your products at the top of the Google results when people are actively searching and looking to buy products that you sell. It is straightforward and effective.
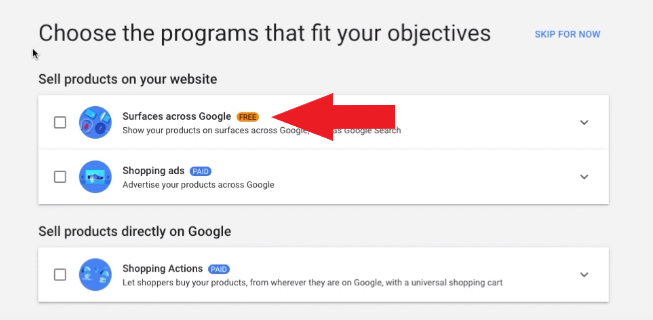
An excellent way to get started is to set everything up and run the free organic listings called – Free Listings.
To set up Google Shopping Ads, you will need a Google account and an eCommerce store.
The most technical part is verifying your website off setting up Google Shopping Ads is verifying your website in the Merchant Center. To verify that you own your eCommerce store, you will also need a Google Analytics account, a Google Tag Manager account, or the ability and access to the code on your website.
Consider hiring a freelancer to do this for you if you are not sure how. It should only take them around 10 minutes to do. You can find freelancers on Upwork.
Your eCommerce store will also need to clearly state your returns policy and your contact details, including a phone number. Consider using a phone answering app or service. Moneypenny offers a phone answering service in the UK and US.
Sign Up to Google Merchant Center
In order to run a Google Shopping Ads campaign, you will need to sign up for a Google Ads and Google Merchant Center accounts.
- Search for Google Merchant Center and click the first result
- Click “Get Started”
- Enter your business information including country of operation, name and timezone
- Read and Agree to the Terms & Conditions (if you are happy with them)
- Click “continue”
- Tick to sign up to “Free Listings”
- Click “Continue”
- Click “Create Account”
Set Up Free Listings
- From the homepage, click “Continue” next to “Free Listings” (it should be near the right of the screen)
- On the next page, scroll down and click on “Provide your website URL”
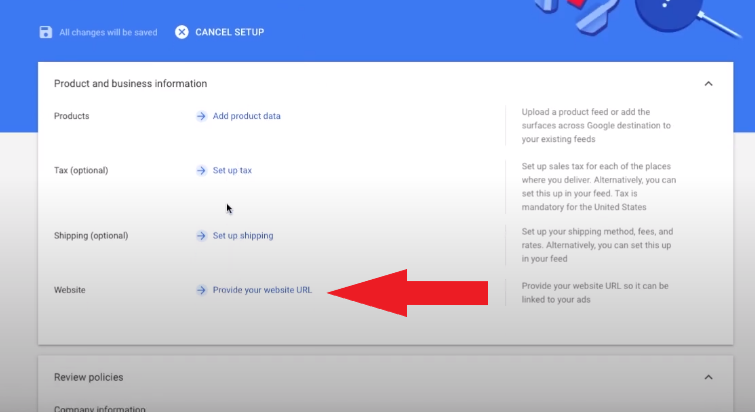
- On the next page, enter your full URL including https:// – e.g.https://nice-mma.com/
- Verify and claim your website by clicking any of the 3 options displayed – Google Analytics, Tag Manger or access to my server.
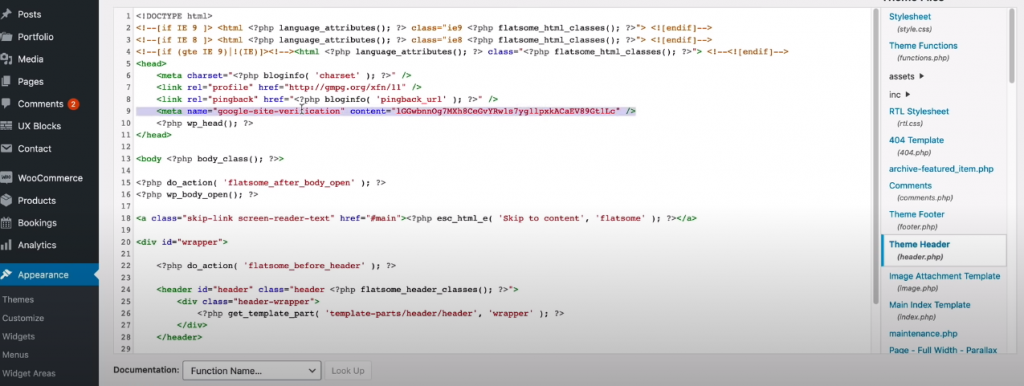
- If you have a WordPress website, the “access to my server” option will probably be the simplest – editing the code can cause problems if you are not sure what you are doing. Consider hiring a freelancer if you are not sure how to verify your website.
- If you are going to verify your site – Copy the meta-code that is given to you and then login to your admin section of your website. Most WordPress themes will have a side-menu option of “Appearance” and within that “Theme-Editor”. Then paste in the code above the </head> tag:
- If you have a Shopify website, follow the steps outlined in this video.
- Once the website URL has been verified and claimed, click on the top left to go “back to Free Listings”
- Next click to “set up shipping”
- Enter the shipping information, as it appears on your website. Enter the type of shipping rate – e.g. “flat rate shipping”, the countries that you ship to, the currency the shipping is charged with, delivery time and the cut off time for deliveries to be shipped.
- Click “Save” once you have entered all the shipping information
- Click “Back to Free Listings”
- Click “Set up Tax”
- If you are in the USA, Google can setup your tax for you. Choose the recommended option, at the bottom – “Set up Sales Tax for states in which you charge sales tax (recommended)
- Click “Save” and then select the state which you are located within and then select “Use Google determined tax rate and click “Save”
- Click to go back to Free Listings
- Click on “Add Product data”
- In the Feeds section, click the big blue and white plus + icon
- Select country and language and tick “Free Listings”
- Click “continue”
- Name your feed. “Feed 1” or “Crawl 1” would be fine for example
- Select “website crawl”
- Click “continue”
- Select “Generate a new Google spreadsheet from template”
- Click “Create Feed”
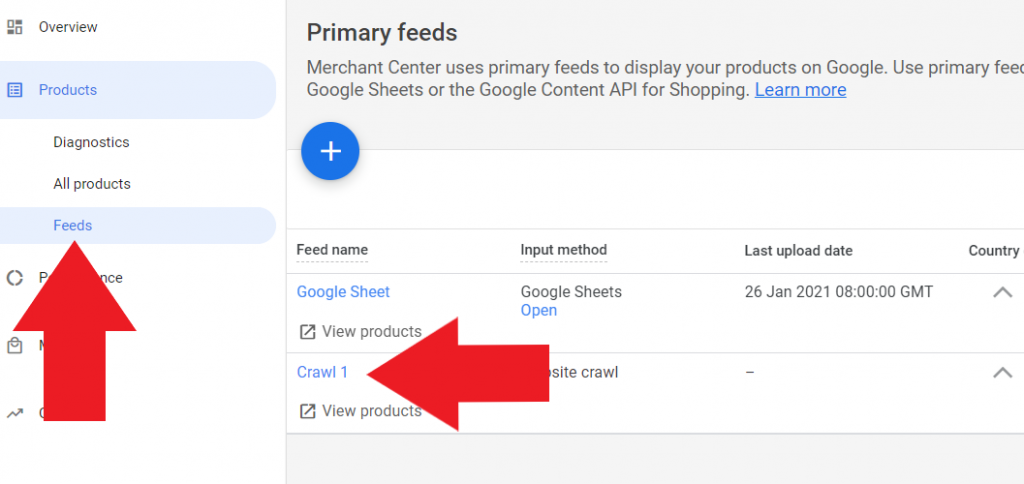
- Back on the homepage of Merchant Center, under the side menu – products -> Feeds, you should now see your product feed:
Set up Google Ads to create a default shopping ads campaign
The reach and impressions with the free listings is very limited. When you want to switch and add the default Google Shopping Ads to your account, then you will need to sign up with Google Ads and provide them with a credit or debit card under the “settings & billing” section, at the top right of the interface. Remember to setup the shopping ads in Merchant Center too, the process is almost identical to the one for the Free Listings.
- Keep Merchant Center open in one tab of your browser
- Go to adwords.com
- Click to “switch to expert mode” (near the bottom of the screen) when prompted to give your advertising goal
- Now click the small text saying “Create account without campaign”
- Confirm business information by clicking “submit”
- Go to “Tools & Settings” in the top right (wrench icon) and “switch to expert mode”
- Go to “Tools & Settings” and “linked accounts”
- Find Google Merchant Center and click “details”
- Go back to your Merchant Center account – “Settings” and then “Linked accounts”
- Under the Google Ads tab, check the ID is the same as in Google Ads and click “Link”
- Back in Google Ads – click to refresh the page and click “approve)
Once you have linked your Google Ads and Merchant Center account you should also look to setup conversion tracking in Google Analytics. For WordPress websites, using WooCommerce, see this video.
Create a Google Ads Campaign
- On the Google Ads homepage, click “+ NEW CAMPAIGN”
- Click “Sales”
- Click “Shopping”
- Select the relevant country and then “Standard shopping campaign”
- Give the campaign a name and select “Manual CPC”
- Enter your daily budget – start with a low amount per day, even though the free listings should be free – just in case!
- Untick the Networks – Search and display – unselect them
- Select the relevant location and under location options, and select “People in your targeted locations”
- Set a start and end date and click “Continue”
- Now set up an ad group – select “product shopping”
- Name the Ad Group
- Enter a CPC bid amount. Start low and increase it if you get no impressions. Start off with $1 for example – but you can go as low as a few cents
- Click “save”
- Back on the Google ads homepage, click “shopping campaign” in the side-menu, then “product groups” and then click the plus + sign next to “all products”
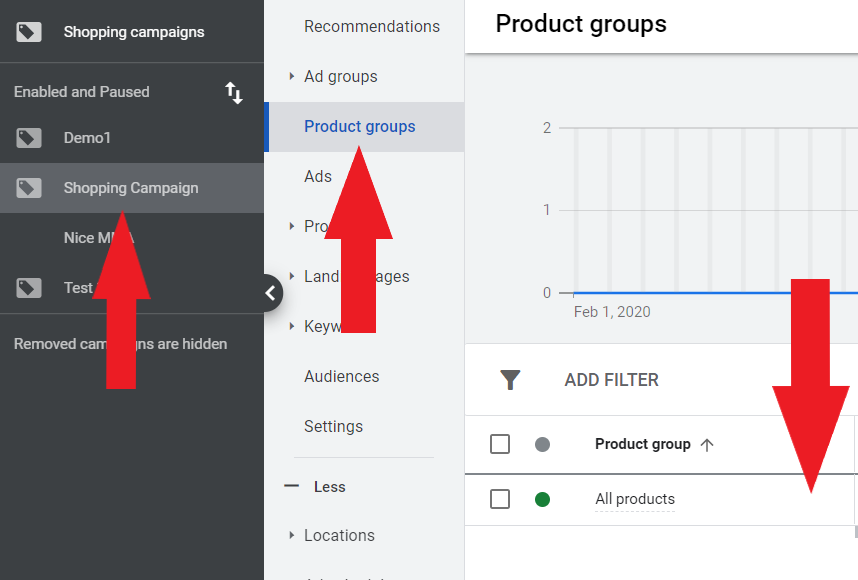
- Select “item ID” from the dropdown menu
- Select all products with the tickbox
- Click “continue to edit bids”
- Now you can edit bids for specific products
Editing bids for specific products is essential if you want your campaigns to get the best return on investment.
And that’s it! Always make “data driven decisions” and continually optimize your campaigns by testing and continually learning. Good luck…