The most important graphical element of any website is its header. so it’s important to get it looking good. In this tutorial, I am going to share with you that how to designing a website or blog header in adobe Photoshop CS5. I’ll use layer styles, and a host of other expert techniques to create a sleek, modern website header.
It will take you one hour and a half to learn the procedure. This tutorial is worked out for the beginners, it gives you the detailed instructions and the professional tips. I hope you will like this useful website header tutorial. So, let’s start!
Most popular and best photoshop tutorials:
- Difference Between Opacity and Fill Options in Photoshop
- How to Create a Pencil Sketch Effect in Photoshop CS5
- Create a Grungy Rusted Metal Text Effect in Photoshop
- Creating a Watercolor Painting Effect in Photoshop
Creating the Beautiful Sleek Look Header in Photoshop: Final Preview

Tools and Resources

Photoshop Tools
- Rectangular Marquee Tool
- Text Tool
Lets start to create our cool website header in photoshop.
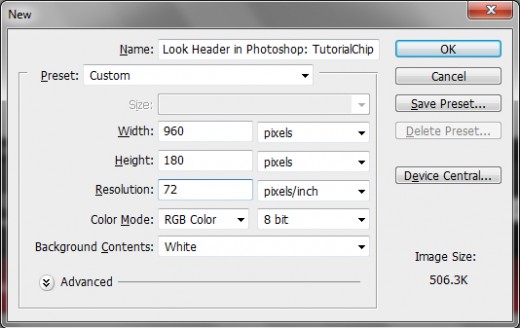
Step 1
1st of all create a new document (Ctrl+N) with 960×180 of size.
Step 2
Take a new layer name it “BG” and fill it with black color.

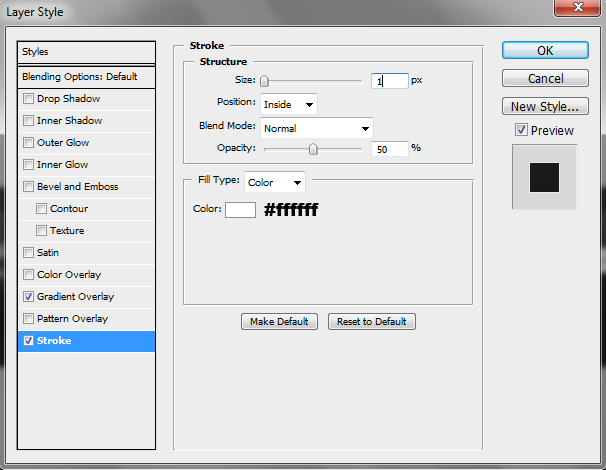
Step 3
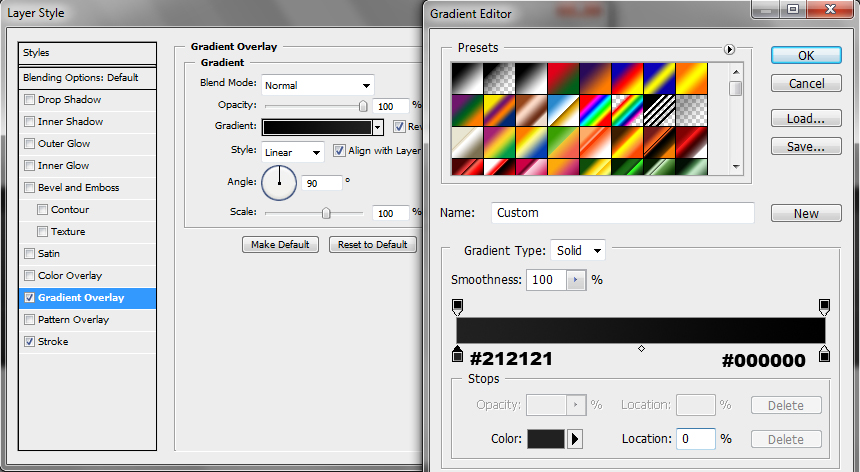
Now take new layer name it layer “1st rectangle” with the help of rectangular marquee tool (M) make a selection and fill it with white color.

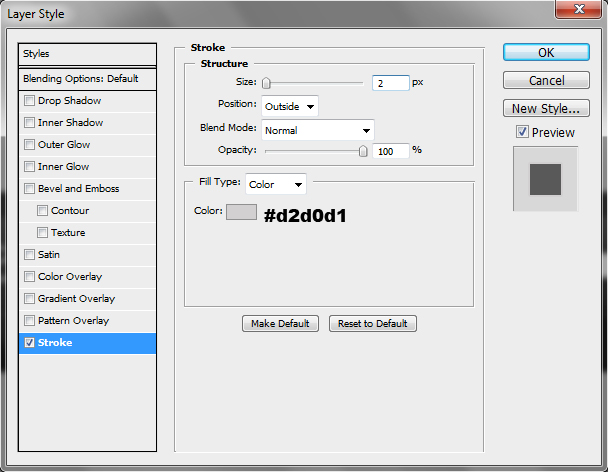
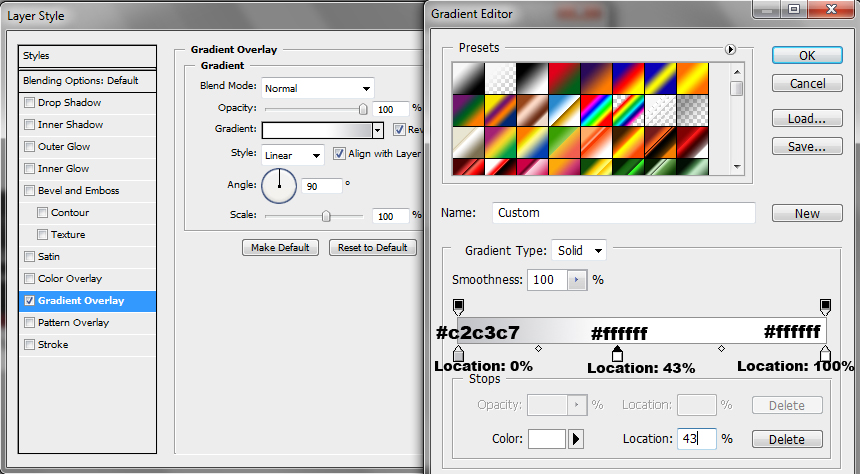
Now we will applying layer styles on 1st rectangle layer.
Gradient Overlay:
Stroke:

After applying these layer style we have get a cool effect on this layer as like in preview below.

Step 4
In this step now we will add a CS5Tutorials logo. Select the Text tool, type the text for your logo as u like. We have type CS5Tutorials.Com as like in preview. You can use the any one logo picture.
Step 5
Now we will create the search box right side of the header. 1st of all take a new layer select the rectangular marquee tool (M) take a selection fill it with white color and applying the stroke.
Stroke:
After applying stroke now in this box we will type Search this site for… as like in preview below.

Step 6
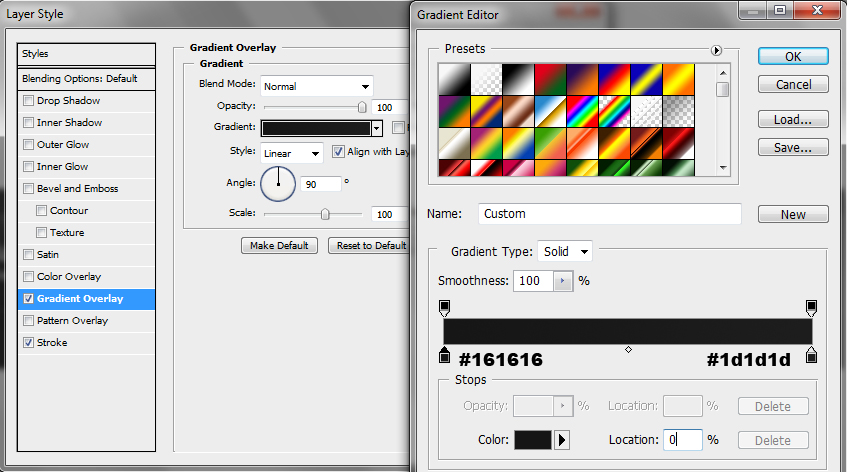
Take a new layer select the again rectangular marquee tool (M) and make a small rectangle fill it white color, applying the gradient overlay and stroke.
Gradient Overlay:
Stroke:
After applying these layer styles we have cool effect as like in preview below.

Now in this small box we have put the magnifi icon as like in preview below.
You can download free Magnifi Icon from internet and save it in your computer.
Step 7
Now in this step we will create the Primary Navigation Bar. First create the primary navigation bar backgrond.
Take a new layer draw a rectangle with the help of rectangular marquee tool and fill it with white color and applying the gradient overlay.
Gradient Overlay:

After applying gradient overlay we have perfect primary navigation bar bg.

Step 8
Now we will type our navigation bar with the help of text tool (T) as like in preview below picture.

OK, if you want the make the hover state then you can easily create it. We want that Tutorials button convert in to hover state when we our mouse cursor take our the Tutorials button, first change the the color of Tutorials in to black.

Now choose the again rectangular marquee tool take a new layer bottom of the Tutorials button and create a rectangle and fill it with white color and applying gradient overlay.
Gradient Overlay:
After applying the gradient overlay we have get best hover state as like in screen short.

Step 9
OK, now we will create the Secondary Navigation Bar top of the header.
In secondary navigation bar you can type your text as you like.
Final Preview
Hope, following this comprehesive and detailed tutorial, it was easy for your to create this sample header. Remember if you have any questions or comments about this tutorial to leave your responses in the comments below and we will get back to you very quickly. Be sure to visit our contact page if you have an idea for a tutorial you’d like to see.